Behind every sharp, well-exposed photo lies a delicate balance of three critical elements: aperture, shutter speed, and ISO. When these settings are misunderstood, even the best compositions fail . But once you master the exposure triangle, you'll have complete creative control over your images—freezing motion, blurring backgrounds, or shooting in low light with confidence .
This cheat sheet is your quick-reference guide to camera settings. Whether you're shooting portraits, landscapes, action, or nighttime scenes, you'll find the exact settings to start with—plus the knowledge to adjust them for any situation.
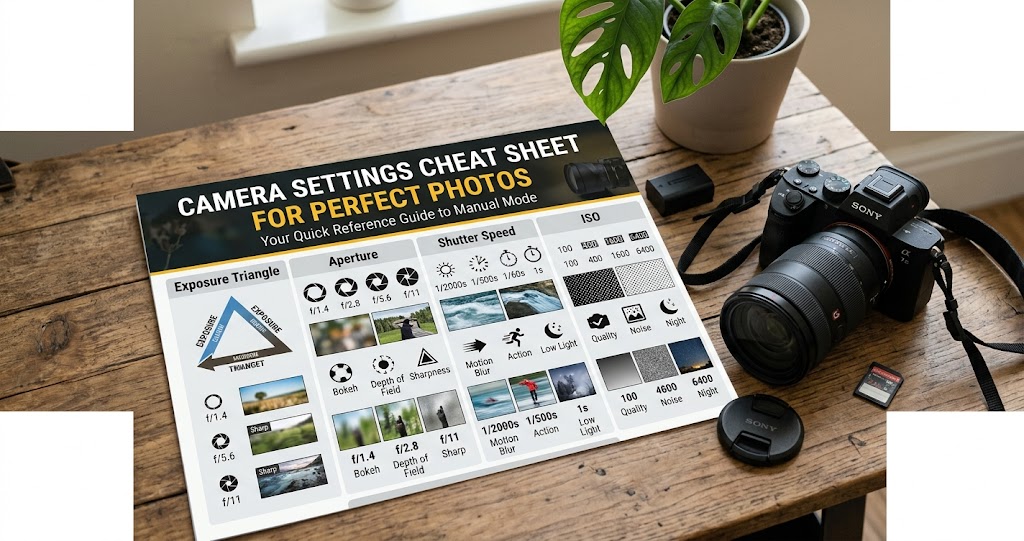
Master the Exposure Triangle
Aperture: Depth of Field Control
Aperture is the adjustable opening in your lens that controls how much light reaches the sensor . It's measured in f-stops (e.g., f/1.4, f/2.8, f/8, f/16).
Wide Aperture (f/1.4–f/2.8)
Large opening, more light, shallow depth of field (blurry background). Perfect for portraits and low light .
Mid Aperture (f/5.6–f/8)
Balanced, often sharpest for your lens. Good for general photography.
Narrow Aperture (f/11–f/16)
Small opening, less light, deep depth of field (everything sharp). Ideal for landscapes .
Pro tip: Lower f-number = wider aperture = more light + more background blur. Higher f-number = narrower aperture = less light + more depth of field .
Shutter Speed: Motion Control
Shutter speed is the duration the sensor is exposed to light, measured in seconds or fractions of a second (1/4000s to 30s) .
Fast (1/500s–1/4000s)
Freezes motion—sports, wildlife, action .
Moderate (1/60s–1/250s)
Handheld general shooting, portraits.
Slow (1/30s–30s+)
Requires tripod, creates motion blur (light trails, waterfalls) .
Rule of thumb: When handholding, use a shutter speed faster than 1/(focal length). For 50mm, use 1/50s or faster .
ISO: Light Sensitivity
ISO measures your sensor's sensitivity to light . Lower values give cleaner images; higher values allow shooting in dim conditions but introduce noise .
Low (100–400)
Cleanest images, use in bright light .
Medium (800–3200)
Indoor, overcast, handheld low light.
High (6400+)
Dim conditions, expect noise/grain .
Pro tip: Keep ISO as low as possible. Increase it only when you can't use a wider aperture or slower shutter speed .
Exposure Triangle Cheat Sheet
Shooting Modes: When to Use Each
Additional Essential Settings
White Balance
White balance removes color casts so whites appear neutral . Auto WB can struggle in tricky lighting, so use presets for accuracy .
Daylight
Sunny conditions
Cloudy
Adds warmth, good for overcast
Tungsten
Counteracts yellow indoor bulbs
Fluorescent
Corrects greenish tint
Custom
Use gray card for accuracy
Autofocus Modes
- One-Shot AF (AF-S): Locks focus when half-pressed. Use for still subjects .
- Continuous AF (AF-C): Tracks moving subjects. Use for action .
- Manual Focus: Full control, use in low light or for precise focus .
Metering Modes
- Evaluative/Matrix: Whole scene average. Best for general use.
- Center-Weighted: Emphasizes center. Good for portraits.
- Spot Metering: Tiny area (2–5%). Use for backlit subjects or high contrast .
Genre-Specific Settings Cheat Sheet
Portrait Settings
- Aperture Priority (Av) mode
- Aperture: f/1.8–f/2.8 for blurry background
- ISO: 100–400
- Focus: Single point, focus on the eye
- White Balance: Cloudy for warmth
Landscape Settings
- Aperture Priority (Av) or Manual
- Aperture: f/8–f/16 for deep depth of field
- ISO: 100 (lowest native)
- Focus: Manual, hyperfocal distance
- Tripod: Essential for sharpness
Action / Sports Settings
- Shutter Priority (Tv) or Manual
- Shutter Speed: 1/500s–1/2000s to freeze motion
- Aperture: f/2.8–f/4 (if light permits)
- ISO: Auto or adjust for exposure
- Focus: Continuous AF (AF-C)
- Drive Mode: Continuous/burst shooting
Low Light / Night Settings
- Manual Mode
- Aperture: Widest possible (f/1.4–f/2.8)
- Shutter Speed: Slow (use tripod)
- ISO: Raise as needed, but expect noise
- Focus: Manual (autofocus struggles in dark)
- Remote shutter or self-timer
Product / Still Life Settings
- Manual Mode
- Aperture: f/8–f/11 for sharpness
- ISO: 100 (lowest)
- Shutter Speed: Moderate, use tripod
- White Balance: Custom with gray card
File Format: RAW vs JPEG
Pro tip: Shoot RAW if you want full control in post-processing. Use JPEG+RAW if you need quick JPEGs but want RAW backup.
Quick Reference: Common Situations
Situation-Based Cheat Sheet
Common Mistakes to Avoid
Do
- Check your ISO before shooting—don't leave it on auto if you want low noise
- Use a tripod for shutter speeds below 1/60s
- Keep lens clean—smudges reduce sharpness
- Use exposure compensation to adjust brightness in semi-auto modes
- Review histogram to check exposure
Don't
- Don't rely on Auto White Balance—it kills mood
- Don't use too high ISO when you could use a tripod
- Don't shoot wide open (f/1.4) if you need everything in focus
- Don't ignore shutter speed for your lens—watch for camera shake
- Don't delete photos without reviewing—you might miss a keeper
Your 7-Day Settings Challenge
- Day 1: Shoot in Aperture Priority. Experiment with f/1.8, f/5.6, and f/16. Notice how background blur changes .
- Day 2: Shoot in Shutter Priority. Try 1/30s (blur), 1/250s, and 1/1000s (frozen) .
- Day 3: Manual mode only. Practice balancing all three settings for correct exposure .
- Day 4: Low light practice. Use widest aperture, raise ISO, test your camera's noise limits.
- Day 5: Focus modes. Shoot moving subjects with AF-S and AF-C. Compare keepers .
- Day 6: White balance. Shoot same scene in Daylight, Cloudy, Tungsten, and Auto. See differences .
- Day 7: Shoot RAW+JPEG. Edit RAW file to match your vision—see the difference .
Final Thoughts
Understanding your camera's settings isn't about memorizing numbers—it's about knowing which trade-offs to make for your creative vision . Every change to aperture, shutter speed, or ISO affects both exposure and the artistic look of your image .
Start with these cheat sheet settings, experiment, and soon you'll adjust them instinctively. As photographer Joe Yablonsky notes, learning to capture the depth of field, motion effects, and exposure you want comes from making quick adjustments in the field .